
TL;DR
Using a closet as a vocal booth works best when you focus on reflection control and placement rather than just soundproofing. Sealing gaps, adding absorption, and proper mic position make a big difference. A closet can be a small, effective space if you treat it right.
Imagine turning a tiny closet into a professional-sounding vocal booth. It’s a compact, budget-friendly hack that many creators swear by. But here’s the secret: it’s not just about stuffing foam everywhere. The real magic is in how you place your gear, treat the space, and control sound reflections.
This guide reveals how to turn a closet into a quiet, focused recording spot—without turning it into a soundproof fortress. You’ll learn what works, what doesn’t, and how to avoid common pitfalls that turn a good idea into a noisy nightmare.
Acoustic dampening
& the rig in the closet.
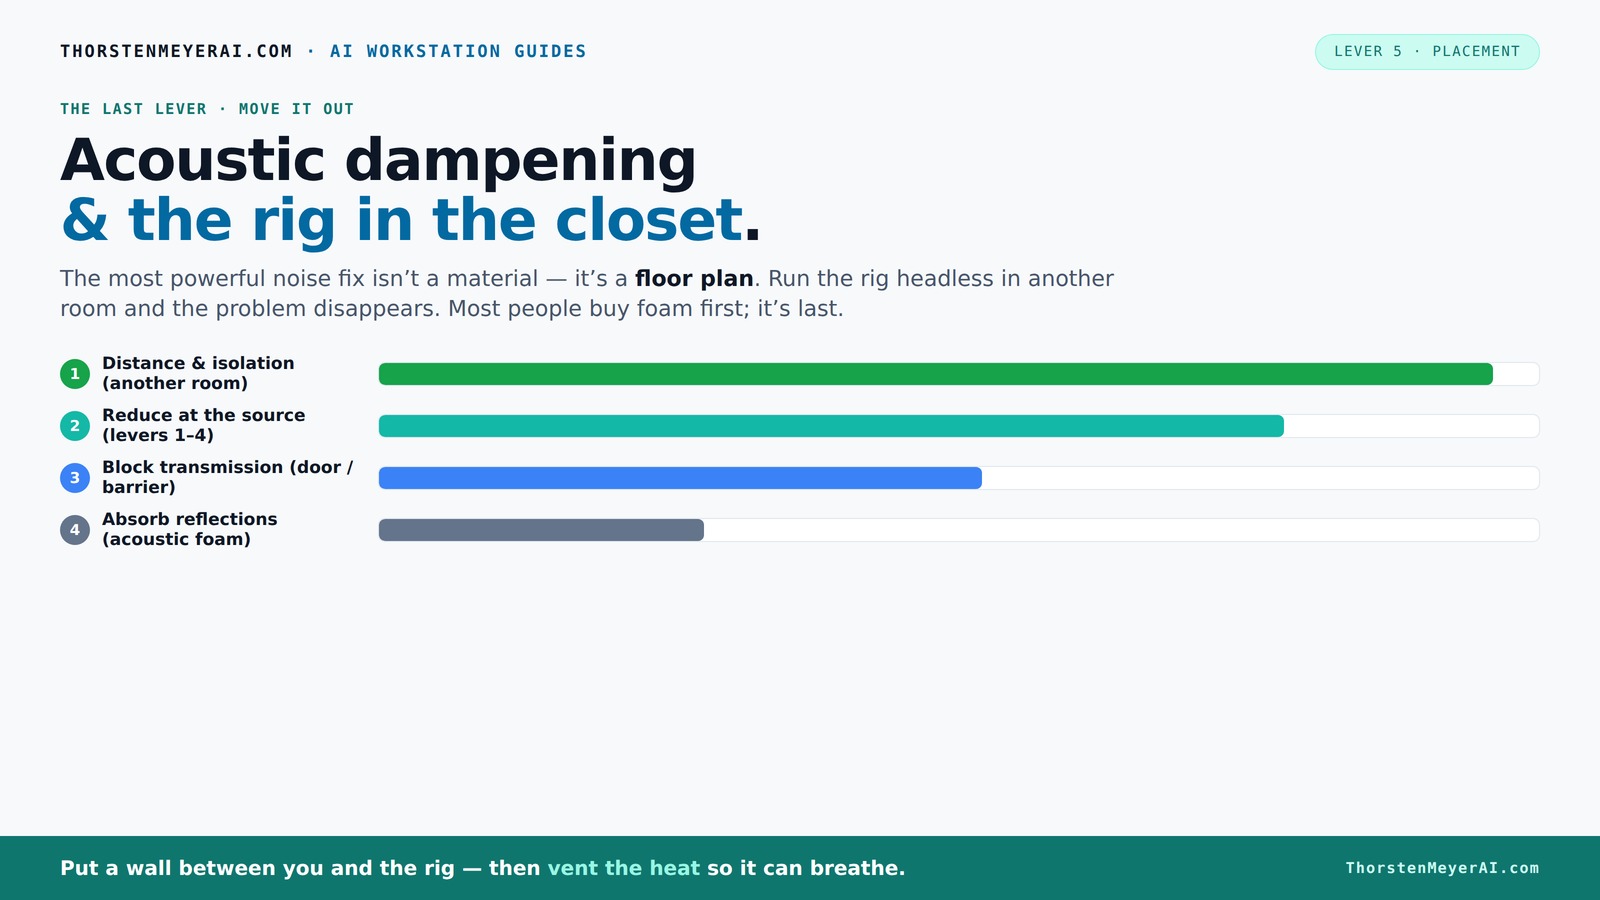
The most powerful noise fix isn’t a material — it’s a floor plan. A rig you can’t hear because it’s in another room beats any amount of foam. Tap the approaches in Part 1 to see what actually works.
(another room)
(levers 1–4)
(door / barrier)
(acoustic foam)
Contain the noise, not the heat
Key Takeaways
- A closet can become a surprisingly effective vocal booth with proper reflection control and sealing gaps.
- Prioritize placing treatment at reflection points and sealing the door before adding foam panels.
- Sealing gaps and using barriers are more effective than foam alone for soundproofing.
- Ventilation is critical when placing a rig in a closet—use passive vents and quiet fans to keep it cool.
- Targeted absorption and soft furnishings in small spaces can dramatically improve sound clarity without major renovations.

Focusound 52 Pack Acoustic Foam Panels 1" x 12" x 12" Sound Proof Foam Panles Soundproofing Noise Cancelling Wedge Panels for Home Office Recoding Studio with 300PCS Double-Side Adhesive
Soundproofing - Acoustic foam panels triangular grooves structure for better noise absorption, helps to reduce and absorb unwanted...
As an affiliate, we earn on qualifying purchases.
As an affiliate, we earn on qualifying purchases.
Why a Closet Can Be Your Best Recording Spot (And Why It’s Not)
Yes, a closet can be a surprisingly good vocal booth. It’s small, enclosed, and easy to control. Think of it as a tiny, natural echo chamber.
But it’s also a box that can bounce sound around, creating harsh reflections and muddy low end. Your job is to tame those echoes, not just throw in foam panels and hope for the best.
For example, a closet with a hard door, metal shelving, and a concrete ceiling can produce a lot of unwanted reverb and resonances. But with the right treatment, it transforms into a cozy, focused space that sounds clear and tight.
Understanding these pros and cons helps you prioritize what to treat and how to set up your gear for optimal results, balancing convenience with sound quality.

Audimute Soundproofing Acoustic Door Seal Kit - Door Sweep and Seal - (Standard Size)
Includes a Door Seal (3/16" x 1/2" x 25') and a Door Sweep (1/2" x 1.5" x 4').
As an affiliate, we earn on qualifying purchases.
As an affiliate, we earn on qualifying purchases.
Acoustic Dampening vs. Soundproofing: What’s the Real Difference?
Acoustic dampening is about controlling reflections and echoes inside a space—making it sound better for recording. Soundproofing aims to block noise from leaking out or coming in.
Inside a closet, dampening involves adding soft materials like foam, blankets, or rugs to soak up sound waves. These materials reduce the harshness of reflections, which can cause muddiness and echo that muddy your recordings. Think of it as giving your space a gentle hug that absorbs unwanted reverberations.
Soundproofing, on the other hand, involves sealing gaps, adding mass to walls, or building barriers to prevent sound from escaping or entering. This is crucial if you’re trying to keep external noise out or avoid disturbing neighbors. However, it’s often more costly and complex than simple dampening.
Understanding this distinction is key: if your goal is clearer recordings, focus on dampening. If you need to block external noise, combine dampening with sealing and barriers. Each approach involves tradeoffs—dampening is easier and cheaper but less effective at blocking sound leaks, while soundproofing is more involved but essential for isolation in noisy environments.
Tradeoffs exist: dampening provides immediate improvement in sound clarity but doesn’t prevent external noise from entering or leaving. Soundproofing offers isolation but can be expensive and may require structural modifications. Knowing your priorities and environment helps determine the right balance—often, a combination of both is necessary for optimal results.

Aokeo Microphone Isolation Shield, Foldable Mic Shield with Triple Sound Insulation, Reflection Filter with 3/8" and 5/8" Mic Threaded Mount for Recording Studio, Podcasts, Singing, and Broadcasting
The Microphone Isolation Shield features a sound-proof foam front and a ventilated metal back panel to eliminate noise...
As an affiliate, we earn on qualifying purchases.
As an affiliate, we earn on qualifying purchases.
Where to Place Acoustic Treatment in a Small Closet (And Why It Matters)
Proper placement of acoustic panels can drastically improve your sound. The goal is to target the first reflection points and hotspots where sound bounces back into the mic, which are often overlooked but critically impact clarity.
The mirror trick is a practical way to identify these points: sit in your recording position and move a mirror along the walls. Wherever you see the mic’s reflection in the mirror, that’s where sound is bouncing directly into the mic. Placing panels at these spots helps absorb those reflections before they reach your microphone, reducing echo and coloration.
Common spots include side walls at ear level, the wall behind the mic, and the ceiling directly above your head. Bass traps placed in corners are also vital—they target low-end buildup that can cause boomy or muddy recordings. This strategic placement ensures you’re addressing the primary sources of undesirable reflections, leading to a cleaner, more professional sound.
For example, a singer recording in a closet with a hard door might add panels at ear level on side walls and a bass trap in the corner behind them. This setup reduces harsh echoes and improves clarity, making your voice stand out without unwanted coloration.
Choosing the right placement is crucial because it directly influences how sound behaves in your space. If you treat the wrong spots, reflections can still bounce around and muddy your recordings. Conversely, well-placed treatment at key reflection points can turn a cluttered, echo-prone closet into a surprisingly controlled environment that captures your voice accurately and clearly.

Portable Recording Booth for Home Studio, Foldable Sound Isolation Vocal Shield with Floor Stand, High-Density Acoustic Blanket Enclosure for Singing, Voiceover & Podcast, Includes Phone Holder
INSTANT STUDIO-QUALITY "DRY" SOUND: Transform any noisy room into a professional vocal booth instantly. Engineered with high-density acoustic...
As an affiliate, we earn on qualifying purchases.
As an affiliate, we earn on qualifying purchases.
How to Seal and Treat the Closet Door for Better Sound Isolation
The door is often the biggest leak in a closet setup. Sound escapes through gaps, hinges, and cracks, undermining your efforts to create a controlled environment. Proper sealing can significantly improve your recording quality by minimizing external noise and preventing sound leakage.
Start with weatherstripping or door seals along the edges to close gaps. These inexpensive solutions can block a surprising amount of sound. For added effectiveness, hang a heavy blanket or a thick moving pad over the door—this acts as an additional barrier, absorbing sound and preventing it from escaping or entering.
For example, a streamer recording vocals in a closet improved instantly after sealing the door with weatherstripping and hanging a quilt. It cut the noise bleed by nearly 50%, leading to clearer recordings and less echo. Keep in mind that no seal is perfect, but every improvement reduces background noise and reflections, making your recordings more professional.
Tradeoffs include potential inconvenience or slight reduction in ventilation, but the gains in sound clarity often outweigh these drawbacks. Sealing gaps is one of the most cost-effective ways to enhance your space’s acoustic isolation.
Understanding the importance of sealing gaps helps you appreciate that even small improvements can make a big difference. It’s a tradeoff between convenience and sound quality, but in most cases, sealing gaps is a straightforward upgrade that pays dividends in clarity and noise reduction.
The 'Rig in the Closet' Setup — How to Keep It Cool and Quiet
Placing a high-power PC or GPU in a closet creates a heat trap, which can turn your quiet setup into a noisy furnace. The trick is to add ventilation that moves hot air out without introducing noise or outside contaminants into your recording space.
Use passive vents or install a quiet exhaust fan. For instance, a small, low-noise fan in a vent hole can pull hot air out while drawing cooler air in through another opening. This setup prevents heat buildup without significantly increasing noise levels.
Some builders go further with ducted exhausts and temperature-controlled fans, which keep the rig cool without adding noise. This ensures your rig stays within safe operating temperatures while remaining silent outside the closet. Proper ventilation is crucial — overheating can cause performance issues or noise from fans ramping up, negating your quiet recording environment.
Learn more about managing heat in a compact space in this guide to reducing heat and noise in your AI workstation.
Balancing cooling and noise control is essential to maintain a quiet environment while ensuring your equipment runs efficiently. Investing in quiet fans and strategic vent placement can make your closet rig both cool and silent, avoiding heat-induced noise or hardware failure.
It’s worth noting that improper ventilation can introduce noise or dust, which can affect your recordings or hardware longevity. Therefore, choosing the right fan and sealing any leaks around vents are essential steps. The goal is to create a passive or low-noise airflow that maintains temperature without compromising your sound environment.
Tiny Space, Big Impact: How Much Absorption Do You Need?
In a small closet, targeted absorption is more effective than covering every surface. The key is to identify the main reflection points—areas where sound bounces directly into your microphone—and treat those spots specifically. This focused approach minimizes unnecessary treatment, avoiding the risk of over-damping which can make the space sound dull or unnatural.
Adding thick panels or bass traps at these points reduces the amount of reflected sound that reaches the mic, which in turn decreases reverb and muddiness. For example, installing 2-inch thick acoustic foam at reflection points and corner traps can cut reverb by 70%. This targeted treatment improves clarity without making the space sound overly dead, maintaining a lively yet controlled environment.
Understanding the importance of selective treatment helps you avoid overdoing it. Over-treating can strip the room of natural liveliness, making your recordings sound sterile or muffled. Instead, focus on the most problematic reflection points and low-frequency buildup, striking a balance that preserves natural sound while reducing muddiness. This approach ensures your recordings are clear, warm, and professional without extensive modifications.
Simple Tricks for Better Sound in a Small Space (No Big Renovations Needed)
Sometimes small tweaks make the biggest difference. Use rugs, blankets, and soft furnishings to absorb sound and reduce reflections, creating a more controlled environment without costly renovations.
Place a thick rug on the floor to dampen reflections from hard surfaces. Hang blankets or quilts over hard surfaces like walls or the closet door to absorb sound energy. Additionally, adding a foam panel or two behind you can further reduce reflections that bounce back into your mic.
These DIY solutions are cost-effective and easy to implement, but their impact is substantial. For instance, a YouTuber added a blanket over the closet door and a rug on the floor, which significantly improved vocal clarity and reduced harshness. These small, strategic adjustments help craft a more professional sound environment without needing to overhaul your entire space.
Remember: the goal is to reduce harsh reflections and control reverberation, making your recordings sound warmer and more focused. These simple tricks are a great starting point for any home studio setup.
It’s important to recognize that these minor modifications can dramatically improve your recording quality. While they may seem simple, their impact on reducing unwanted reflections and noise is profound. The key is to experiment with placement—try hanging blankets at different angles or adding rugs in different spots—and listen carefully to the changes. Over time, you'll develop an intuitive sense of where to place these DIY treatments for maximum effect.
Frequently Asked Questions
Can a closet really work as a vocal booth?
Absolutely. With proper reflection control, sealing gaps, and ventilation, a closet can produce clear, professional vocals. It’s a practical solution for small spaces or renters.What’s the difference between acoustic dampening and soundproofing?
Dampening reduces echoes and reflections inside the space, making recordings clearer. Soundproofing blocks noise from leaking out or coming in, which requires sealing gaps and adding mass.Where should I place acoustic panels in a closet?
Place panels at first reflection points—use the mirror trick to find these spots. Also, add bass traps in corners and behind the mic to control low-end rumble.Do I need bass traps in a small closet booth?
Yes, especially if you notice boomy low frequencies. Dense bass traps in corners can smooth out muddiness and improve overall clarity.How much wall coverage is enough?
Target about 20-30% coverage at reflection points, focusing on the sides, ceiling, and behind the mic. Full coverage isn’t necessary but strategic placement is key.Conclusion
Your closet isn’t just a tiny storage space — it can be a sleek, quiet recording haven. Focus on reflection control, sealing gaps, and smart placement, and you’ll find that a small space can punch well above its weight.
Remember, the best setup depends on your goals. Sometimes, a simple blanket, a few panels, and good ventilation are all you need to produce professional-quality recordings in a tiny footprint.